Friday, December 16, 2022

Embedded Messaging with host domain value cannot be hosted on domain Error In Salesforce

Issue:

These types of errors mostly pops up when your working any kind of the Messaging Systems/Live Agent Chat or Messaging In App and Web chat features in salesforce.

In my case this error is on "Messaging In App and Web" chat configuration.

When your configuring the this Messaging In App and Web we need to create a Embedded Service Deployment to deploy this chat button in on your company/local websites.

Solution:

If we look at "Embedded Service Deployment" configuration it will have bunch of the key properties we need to setup like

  • Embedded Service Deployment Name
  • Site Endpoint
  • Domain
  • Messaging Channel
But now we will discuss more about the Domain property details and it's behavior.

Domain: This domain is the main key reason for this issue. Ideally here we need to add the domain name of your company/website where your going add this chat button on web. So, this code can be hosted on this server without any error.

So if here you have entered domain as "srinivas4sfdc.com"  in your configuration ideally this code snippet you need add on this site only else you will receive the same error.

In my case I have added my domain name as my company domain address like yourcompany.com,yourcompanydomain.in etc and when I'm try to add this code snippet on my website domain "srinivas4sfdc.com" I'm getting the same error.

Deployment Setup Screen:


Error On Website:


Please comment or write us if you have any queries/requirements.

Please like,follow,bookmark,subscribe this site to receive daily updates.


FaceBook Page - I Love Coding. You?


Hope this helps you..Enjoy..!

How To End The Live Agent REST API Chat In Salesforce

If your planning to implement the Live Agent Chat we can use of 2 approaches as listed below

  1.  With help of the Embedded Services code snippet generated by salesforce
  2.  Using the Salesforce Live Agent REST API Integration.

In this article we will discuss about how to end the chat initiated by the "Salesforce Live Agent REST API Integration" using the API's in Salesforce.

When I looked at the Salesforce document it's feels me very simple but while doing the actual integration I have faced couple of issue .So, I thought of sharing the same with you guys so that if you have come across same concerns it will clear lot of issues.

Salesforce Document :

Key Points :

1. Is the Request body is valid: 

Yes ,it's valid json body ,even i had the same conception but it's worked with body type raw json/ raw text and the possible request bodies are listed below and it worked for me with any of body request.

1. {"reason":"client"}

2. {reason:"client"}

3. {"type":"ChatEndReason","reason":"client"}

Possible Values for "reason" property:

-For value, 'agent' cannot be used. As this will be a rest call that will be fired by end used, then how is it possible that agent has ended the chat.

- For value, 'clienttimeout', it cannot be explicitly sent as this is value that will be set automatically when the chat ends if end user takes more than configured time to reply.

- For value, 'client', it works fine and it is the only intended value that should be sent.

2.Header Values(Check Underscore and Hypon):

X-LIVEAGENT-API-VERSION:56
X-LIVEAGENT-AFFINITY:10.44.144.152:443
X-LIVEAGENT-SESSION-KEY:1a71214c-e!1671173289038!qwUZfQ56kOpSHSRIOINyBZRoGug=

These 3 keys would be fine enough and sequence is not required. The below both
values will taken from the Session API which will be invoked initially to start the
live agent chat session.

X-LIVEAGENT-AFFINITY: aa:bb:ccc:ddd:443 format/hetehksd (8 digit alphanumeric token) both are valid
X-LIVEAGENT-SESSION-KEY: We need to take the key value not the id value from session api.

3. Sample Request:

 End Point    - https://hostname/chat/rest/Chasitor/ChatEnd
 Type         - Post
 Headers      - As mentioned above
 RequestBody  - As mentioned above


Sample Curl:

 Update your chat setting url in host name
curl --location --request POST 'https://hostname/chat/rest/Chasitor/ChatEnd' \
--header 'X-LIVEAGENT-API-VERSION: 56' \
--header 'X-LIVEAGENT-AFFINITY: 11.58.224.242:443' \
--header 'X-LIVEAGENT-SESSION-KEY: 1a71214c-ed05-8383-a0c3-db568dbd6903!1671173289038!qwUZfQ56kOpSHSRIOINyBZRoGug=' \
--header 'Content-Type: application/json' \
--data-raw '{"reason":"client"}'


If your receiving the below status code please check once
- 403 You initiated the request but no agent's are available to accept the chat so please
check the agent availability api before call session api/chat visitor session api.
- 400 You might have the error in your end point or headers or body.

Happy Learning 😊 


Please comment or write us if you have any queries/requirements.

Please like,follow,bookmark,subscribe this site to receive daily updates.


FaceBook Page - I Love Coding. You?


Hope this helps you..Enjoy..!


Wednesday, August 10, 2022

Push Topics In Salesforce

We might have heard about the Push topics, If not these are mainly used for generating the events basis on some criteria defined on the SOQL and all these events will be consumed by the all the subscribers of the topic.

Let's assume if you have created some functionality using the Push topics either on VisualForce or in #lightningwebcomponents. It's Working as expected whenever there is change in specified object record etc..

We have refreshed the sandbox from the production and the same functionality is not working in sandbox 🤔. Interesting what is missing here regarding #pushtopics.


The point to be noted here is when we created any #pushtopics either on production or sandbox salesforce by defaults creates an entry in #pushtopic table as a record data not like metadata.

So, obviously when we refreshed the sandbox the records/data will not be created in sandbox from production only metadata will be copied from the production.

If you need these #pushtopic you need to create it again in sandbox manually.

Happy Learning 😊 


Please comment or write us if you have any queries/requirements.

Please like,follow,bookmark,subscribe this site to receive daily updates.


FaceBook Page - I Love Coding. You?


Hope this helps you..Enjoy..!

Tuesday, July 26, 2022

How To Download the Package.xml Using the Outbound Change Set Name

As we know the easiest way to deploy the components from sandbox to sandbox/production by using the  Change Sets. Some times we might end up use cases where change sets might not be supported and we are trying to deploying using the ANT, Workbench or Visual Code. In all these cases we might need the package.xml file is required either to retrieve the package or to deploy the package.

Preparing the package.xml file by adding the each component manually is little bit of hard .So, I want to try adding the all the list of components using the change set name because it's easy to add from the UI and with help of change set name I want to download the package.xml for further processing. 

Is it really possible to download the package.xml file using the change set name 🤔? The simple answer is Yes ,we can do this by following the below steps .


1. Go to Setup ---> Search for Outbound Change Sets.

2. Click on New --> Enter Change set name and Description.


3. Add all the components you want to deploy.

4. Copy the Change set name as shown below.


5.Login to the Workbench with same sandbox where change set is created.

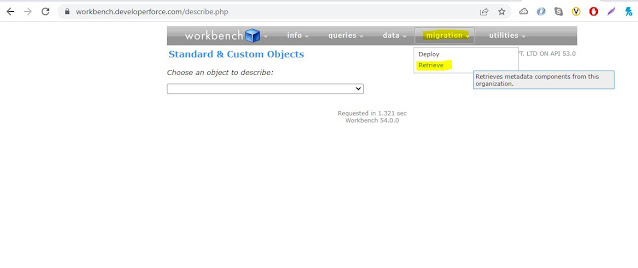
6. Click on the retrieve option under the Migration.


7. Enter the Change Set Name in Package Names text box and Check Single Package


8. Click Next and then on Retrieve button.

9. Once Retrieve result Zip file is ready just click on download zip file.


10.Extract the file inside that you can see the package.xml file.


Happy Learning 😊 


Please comment or write us if you have any queries/requirements.

Please like,follow,bookmark,subscribe this site to receive daily updates.


FaceBook Page - I Love Coding. You?


Hope this helps you..Enjoy..!


Saturday, July 16, 2022

How To Stop Workflow Rules and Outbound Messages in Sandbox Automatically

We have couple of outbound messages linked under the workflow rules and all these outbound message will send some of custom objects data and standard objects data to external systems everytime any kind of DML operation happens on these objects. 

Everything got set up and working as expected. But recently we have come across a situation where all the outbound messages are pushing data from sandboxes to same external systems assuming that we forgot to disable these workflow rules in sandbox before we activate it and somehow we missed to change the outbound messages end point from production to sandbox.

Because of all these things the sandbox data got messed up with the production data. So, we started exploring the options how can we stop all these Workflow rules automatically in sandbox or can we change the endpoint from production to stage automatically after refreshing the sandbox.

As a solution we come across multiple options but as a quick fix we have chosen to use the below solution.


1. Identify the environment like sandbox or production.

  • Use the username to identify this assuming we will add sandbox name in the end of username but in production we will not have any name after email Id.
  • Use the SOQL to identify the environment 
2. Assuming we have decided to move with username flow create a formula field on User Object as Checkbox. 

3. Assume formula field name as "isProduction__c" and this will get updated to true in case of if user in production env and else false in sandbox.

4. Use this field in all your workflow rule by adding CurrentUser under that select isProduction__c field.

Now all your workflow rules will get evaluated to true if the logged in user in production else the rule will not get satisfied so your Workflow rules will not get fired in sandbox. 

With this approach we don't need to worry about the disabling the workflow rules and changing the outbound messages endpoints to stage. We can use other options to as well but we thought this is simple and easy to implement for Admins too...

Happy Learning 😊 

Please comment or write us if you have any queries/requirements.

Please like,follow,bookmark,subscribe this site to receive daily updates.


FaceBook Page - I Love Coding. You?


Hope this helps you..Enjoy..!

Sunday, June 19, 2022

Salesforce Einstein Products

 Salesforce Einstein Products

-----------------------------------------------------

As we know Salesforce has it's own artificial intelligence, natural language processing and deep learning technologies embedded product named it as "Einstein".

Some of this product features are already part of Salesforce clouds like sales cloud, service cloud and marketing cloud etc.. 

As a developer if you want to use these feature to build out of box features use it as well. 

Some of the key products of einstein are listed below. 

1. Einstein Bot

2. Einstein Next Best Action

3. Einstein Case Classification

4. Einstein Discovery

5. Einstein Prediction Builder

6. Einstein Language

7. Einstein Vision


Wednesday, June 15, 2022

Write A Test Class For Getter and Setter Methods in Salesforce Apex

Please use the below code snippet in you case you have getter and setter methods in your apex class and want to cover up the same lines in test class.

Main Class:

Public class SreeTestCase
{
 public List<SelectOption> caseStatusList 
 {
  get {
	List<SelectOption> options = new List<SelectOption>();
	for( Schema.PicklistEntry f : Case.Status.getDescribe().getPicklistValues()) 
        {
	  options.add(new SelectOption(f.getValue(), f.getLabel()));
	}
	return options;
  }
		set;
 }
}

Test Class:

@isTest 
private class SreeTestCaseTestClass 
{
    static testMethod void testStatusList() 
	{
		SreeTestCase st = new SreeTestCase();
		List<SelectOption> options = new List<SelectOption>();
		options = st.caseStatusList;
	}
}


Please comment or write us if you have any queries/requirements.

Please like,follow,bookmark,subscribe this site to receive daily updates.


FaceBook Page - I Love Coding. You?


Hope this helps you..Enjoy..!

How to Delete (Bulk) Custom Metadata Records in Salesforce.

 Scenario:

You might have used the "Custom Metadata Loader" to perform the bulk insert and bulk update. Sometimes it's might be required to perform the bulk delete also ,but unfortunately this tool doesn't support as of today.

Solution:

So as a workaround we can have apex code snippet which can be used to perform the bulk deletion(in a single run max 200 records) of metadata .Please use the below code snippet for the same.

Source Code:

MetadataService.MetadataPort service = new MetadataService.MetadataPort();

// Set the session id
service.SessionHeader = new MetadataService.SessionHeader_element();
service.SessionHeader.sessionId = UserInfo.getSessionId();

//Add all your metadata records developer name to list
List<String> recordsToDelete = new List<String>();
For(YourMedataDataName__mdt m :[SELECT Developername from YourMedataDataName__mdt Limit 200])
{
	String s = 'YourMedataDataName__mdt.'+m.Developername;
	recordsToDelete.add(s);
}

//Perform the bulk deletion at a time max of 200 records
MetadataService.DeleteResult [] results = new MetadataService.DeleteResult []{};
results = service.deleteMetadata('CustomMetadata', recordsToDelete);

Please comment or write us if you have any queries/requirements.

Please like,follow,bookmark,subscribe this site to receive daily updates.

FaceBook Page - I Love Coding. You?


Hope this helps you..Enjoy..!

Thursday, June 9, 2022

How can we setup different work item capacity for agents in Salesforce Omni-Channel

 Scenario:

Let's assume we have group of users assigned under the omni channel for handling of incoming chat request.
How can we set the different maximum chat limit for user basis on experience. Ex For new joiner we want to setup of maximum cap as 5 and others as 7 chats.

Solution:
Ideally in omni channel the agent capacity and which Omni-channels features can be accessed like auto decline or auto accept of the work items can be performed using the "Presence Configuration" settings.

So in our case also we can create two presence configurations ,one for the new joiners and second for the others. Under the new joiners configuration we will add all the new joiners so when they logged into Omni channel the chat capacity will be picked up from here automatically.


Please comment or write us if you have any queries/requirements.

Please like,follow,bookmark,subscribe this site to receive daily updates.


FaceBook Page - I Love Coding. You?


Hope this helps you..Enjoy..!

Sunday, May 29, 2022

Aura:if isTrue issue in salesforce

If you're facing an issue with Aura:if isTrue while using the And Clause or OR clause we need to know the below points.

According to salesforce documentation And/Or clause only supports two arguments for evaluation.

If you're using more than 2 arguments in And/Or clause by default Salesforce ignores it.


<Aura:if IsTrue ="Or(expression 1,expression 2)">   - - This is valid.

<Aura:if IsTrue ="Or(expression 1,expression 2, expression 3)"> - - This will not work as expected because Salesforce ignores the expression 3 for evaluation. 


Workaround :

If you need to solve this problem simply convert them into simple multiple chain expressions. 

Aura:if IsTrue ="Or(expression 1,expression 2) || expression 3)"> 

Aura:if IsTrue ="Or(expression 1,expression 2) || Or(expression 3, expression 4)"> 


Hope this helps you..Enjoy..!


Please comment or write us if you have any queries/requirements.

Please like,follow,bookmark,subscribe this site to receive daily updates.


Friday, May 27, 2022

How to Link a Child Record Every Time it's Created With An Existing/New Parent Record.

Lets take a use case when a child record has been created it should be automatically link to existing parent record ,in case if parent is not available it should create a parent and link the child record automatically.

The relationship between these objects is "Lookup Relationship" and the identifier to map the child with parent and the identifier when to create a new parent will be discussed below.

Simple use case here is we will have daily time sheet entries of an employee and all these daily time sheet entries should get linked under weekly time sheet entry which is like one entry for one week with 7 daily time sheet under same parent.

We can assume child object as "Daily_Time_Sheet__c" and parent object as "Weekly_Time_Sheet__c". On parent object we will have one field with name as "Parent_User_Week_Start__c(which is an external id) " which is the combination of user id and start date of the week of a given date in "Daily_Time_Sheet__c".The field name in child would be something like "ChildUserIdWeekStrartDate__c".

Source Code:

Trigger DailyTimeSheetTrigger On Daily_Time_Sheet__c(after insert)
{
	List<Weekly_Time_Sheet__c> listWTSToUpsert = new List<Weekly_Time_Sheet__c>();
	List<Daily_Time_Sheet__c> listDTSUpdate = new List<Daily_Time_Sheet__c >();
	Map<String,id> mapHours = new Map<String,id>();
	set<string> setUniqueParent = new set<string>();

	for(Daily_Time_Sheet__c dts:Trigger.new)
	{
		if(dts.ChildUserIdWeekStrartDate__c!=null && dts.Weekly_Time_Sheet__c==null)
		{
			Weekly_Time_Sheet__c wts = new Weekly_Time_Sheet__c();
			wts.Parent_User_Week_Start__c = dts.Chi;
			if(!setUniqueParent.contains(wts.Parent_User_Week_Start__c))
			{
			  listWTSToUpsert.add(wts);
			  setUniqueParent.add(wts.Parent_User_Week_Start__c);
			}
		}
	}
	
	try
	{
		if(!listWTSToUpsert.isEmpty())
		  Database.UpsertResult[] wtsUpsertResult = Database.upsert(listWTSToUpsert,Weekly_Time_Sheet__c.Parent_User_Week_Start__c,false);
	  
		for(Weekly_Time_Sheet__c ws:listWTSToUpsert)
		{
			mapHours.put(ws.Parent_User_Week_Start__c,ws.id);
		}


		for(Daily_Time_Sheet__c dts:[SeLEcT id ,ChildUserIdWeekStrartDate__c,Weekly_Time_Sheet__c FROM Daily_Time_Sheet__c WHERE ID IN: Trigger.new])
		{
			if(dts.ChildUserIdWeekStrartDate__c!=null && dts.Weekly_Time_Sheet__c==null)
			{
				if(mapHours.containsKey(bh.ChildUserIdWeekStrartDate__c))
				{
					bh.Weekly_Time_Sheet__c = mapHours.get(guid);
					listDTSUpdate.add(bh);
				}
			}
		}
		
		if(!listDTSUpdate.isEmpty())
			Database.SaveResult[] wbhUpsertResult2 = Database.update(listDTSUpdate,false);
	}
	catch(exception e)
	{
		system.debug('exception ..'+e);
	}
}

Hope this helps you..Enjoy..!


Please comment or write us if you have any queries/requirements.

Please like,follow,bookmark,subscribe this site to receive daily updates.